Si quieres el patrón gratis gracias a MUFFA puedes pinchar AQUI está el patrón.
Etiquetas
- Amigurumi (8)
- Amigurumi con patrón (8)
- Cadenas - Trabajos a crochet (1)
- Carton Mousse (1)
- felicitaciones (2)
- Flores de Crochet-Ganchillo (7)
- Frivolité (1)
- Parasol - Trabajos a crochet (1)
- pimavera y otoño (1)
- Puntos de Crochet-Ganchillo (5)
- Trabajos a 2 agujas.calcetines navidad (1)
- Trabajos a crochet (1)
Mostrando entradas con la etiqueta Amigurumi con patrón. Mostrar todas las entradas
Ovejita amigurumi con patrón
Aquí os dejo esta monada,
Es sencilla, pero el patrón está en inglés
Materials:
- Worsted weight yarn (gray and white)
- A little bit of black and white yarn for eyes and nose
- US J10 and L11 hook
- fiberfill
Head: (I used L11 hook) [Colour: white]
Rnd 1: 7 sc in a ring (7)
Rnd 2: 2 sc in each st around (14)
Rnd 3: *sc in next st, 2 sc in next st* around (21)
Rnd 4: *sc in next 2 st, 2 sc in next st* around (28)
Rnd 5: *sc in next 3 st, 2 sc in next st* around (35)
Rnd 6: *sc in next 4 st, 2 sc in next st* around (42)
Rnd 7: *sc in next 5 st, 2 sc in next st* around (49)
Rnd 8-10: sc in each st around (49)
Rnd 11: *dec, sc in each of next 5 st* around (42)
Rnd 12: *dec, sc in each of next 4 st* around (35)
Rnd 13: *dec, sc in each of next 3 st* around (28)
Rnd 14: *dec, sc in each of next 2 st* around (21)
Rnd 15: *dec, sc in next st* around (14)
Body (L11 hook) [Colour: white]
Rnd 1: 7 sc in a ring (7)
Rnd 2: 2 sc in each st around (14)
Rnd 3: *sc in next st, 2 sc in next st* around (21)
Rnd 4: *sc in next 2 st, 2 sc in next st* around (28)
Rnd 5: *sc in next 3 st, 2 sc in next st* around (35)
Rnd 6-9: sc in each st around (35)
Rnd 10: *dec, sc in each of next 3 st* around (28)
Rnd 11-13: sc in each st around (28)
Rnd 14: *dec, sc in each of next 2 st* around (21)
Rnd 15-17: sc in each st around (21)
Rnd 18: *dec, sc in each of next st* around (14)
Rnd 19: sc in each st around (14)
Arms and Foot (J10 hook) [Colour: gray]
Rnd 1: 7 sc in a ring (7)
Rnd 2: 2 sc in each st around (14)
Rnd 3-8: sc in each st around (14)
Rnd 9: *dec, sc in each of next st* around (9)
Rnd 10-12: sc in each st around (9)
(Make 4 pieces)
Ears (J10 hook) [Colour: gray]
Rnd 1: 7 sc in a ring (7)
Rnd 2: 2 sc in each st around (14)
Rnd 3-9: sc in each st around (14)
(Make 2 pieces)
Face (J10 hook) [Colour: gray]
Rnd 1: 7 sc in a ring (7)
Rnd 2: 2 sc in each st around (14)
Rnd 3: *sc in next st, 2 sc in next st* around (21)
Rnd 4: *sc in next 2 st, 2 sc in next st* around (28)
Rnd 5: *sc in next 3 st, 2 sc in next st* around (35)
Rnd 6: *sc in next 4 st, 2 sc in next st* around (42)
Rnd 7: *sc in next 5 st, 2 sc in next st* around (49)
Assembly:
- Sew the eyes and nose on the face
- Stuff the head with fiberfill (I stuffed more fiberfill in the head to make some weight)
- Sew the face on the head
- Stuff just enough fiberfill into the tummy (leave the neck, we don't need any filling here, this is how we make it look "sleepy" :))
- Stuff just a little to the arms and foot, leave the opening free of filling
- Do not stuff the ears, sew them to the head
- Sew all the arms and foot on the body
- and Finally, attach the head to the body
- Worsted weight yarn (gray and white)
- A little bit of black and white yarn for eyes and nose
- US J10 and L11 hook
- fiberfill
Head: (I used L11 hook) [Colour: white]
Rnd 1: 7 sc in a ring (7)
Rnd 2: 2 sc in each st around (14)
Rnd 3: *sc in next st, 2 sc in next st* around (21)
Rnd 4: *sc in next 2 st, 2 sc in next st* around (28)
Rnd 5: *sc in next 3 st, 2 sc in next st* around (35)
Rnd 6: *sc in next 4 st, 2 sc in next st* around (42)
Rnd 7: *sc in next 5 st, 2 sc in next st* around (49)
Rnd 8-10: sc in each st around (49)
Rnd 11: *dec, sc in each of next 5 st* around (42)
Rnd 12: *dec, sc in each of next 4 st* around (35)
Rnd 13: *dec, sc in each of next 3 st* around (28)
Rnd 14: *dec, sc in each of next 2 st* around (21)
Rnd 15: *dec, sc in next st* around (14)
Body (L11 hook) [Colour: white]
Rnd 1: 7 sc in a ring (7)
Rnd 2: 2 sc in each st around (14)
Rnd 3: *sc in next st, 2 sc in next st* around (21)
Rnd 4: *sc in next 2 st, 2 sc in next st* around (28)
Rnd 5: *sc in next 3 st, 2 sc in next st* around (35)
Rnd 6-9: sc in each st around (35)
Rnd 10: *dec, sc in each of next 3 st* around (28)
Rnd 11-13: sc in each st around (28)
Rnd 14: *dec, sc in each of next 2 st* around (21)
Rnd 15-17: sc in each st around (21)
Rnd 18: *dec, sc in each of next st* around (14)
Rnd 19: sc in each st around (14)
Arms and Foot (J10 hook) [Colour: gray]
Rnd 1: 7 sc in a ring (7)
Rnd 2: 2 sc in each st around (14)
Rnd 3-8: sc in each st around (14)
Rnd 9: *dec, sc in each of next st* around (9)
Rnd 10-12: sc in each st around (9)
(Make 4 pieces)
Ears (J10 hook) [Colour: gray]
Rnd 1: 7 sc in a ring (7)
Rnd 2: 2 sc in each st around (14)
Rnd 3-9: sc in each st around (14)
(Make 2 pieces)
Face (J10 hook) [Colour: gray]
Rnd 1: 7 sc in a ring (7)
Rnd 2: 2 sc in each st around (14)
Rnd 3: *sc in next st, 2 sc in next st* around (21)
Rnd 4: *sc in next 2 st, 2 sc in next st* around (28)
Rnd 5: *sc in next 3 st, 2 sc in next st* around (35)
Rnd 6: *sc in next 4 st, 2 sc in next st* around (42)
Rnd 7: *sc in next 5 st, 2 sc in next st* around (49)
Assembly:
- Sew the eyes and nose on the face
- Stuff the head with fiberfill (I stuffed more fiberfill in the head to make some weight)
- Sew the face on the head
- Stuff just enough fiberfill into the tummy (leave the neck, we don't need any filling here, this is how we make it look "sleepy" :))
- Stuff just a little to the arms and foot, leave the opening free of filling
- Do not stuff the ears, sew them to the head
- Sew all the arms and foot on the body
- and Finally, attach the head to the body
Todo lo encontré en la pagina de HARUGURUMI, tiene cosas muy monas.
Etiquetas:
Amigurumi con patrón
Hipopótamo amigurumi - patrón.
Que lindo hipopótamo!!
Lo quieres tener contigo? Si?
Pues bien, dirigete a bitter sweetblog y sigue las instrucciones paso a paso que allí nos explican.
Y.... ya me contarás como te ha ido la labor, te parece ????
Lo quieres tener contigo? Si?
Pues bien, dirigete a bitter sweetblog y sigue las instrucciones paso a paso que allí nos explican.
Y.... ya me contarás como te ha ido la labor, te parece ????
Etiquetas:
Amigurumi con patrón
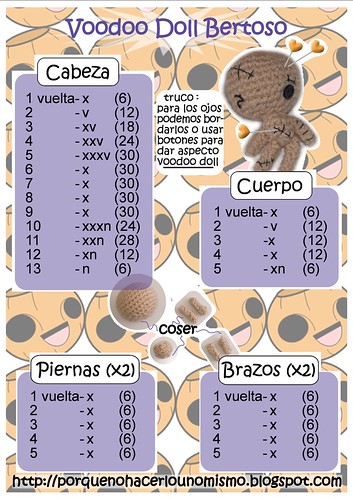
Muñeco Voodoo Doll Amigurumi
Hola practicamos budu? jeje

Aki este fantástico patrón de BERTO que nos lo explica de maravilla.
Ah! os pongo la leyenda:
v: aumento
x: punto bajo
n: disminución.
Espero que os ayude.

Aki este fantástico patrón de BERTO que nos lo explica de maravilla.
Ah! os pongo la leyenda:
v: aumento
x: punto bajo
n: disminución.
Espero que os ayude.
Etiquetas:
Amigurumi con patrón
Maggie y Shelby a dos agujas
Hola mis amig@s, estas lindas muñecas son Maggie y Shelby por Nancy Anderson, a ellas tambien les gusta hacer ejercicio, me encantan estas muñecas, están hechas a punto de media y son super flexibles y amorosas.

»Fotos: Nancy Anderson
Si quereis realizarlas podeis encontrar las instrucciones en petitepurls.com , espero que os salgan super preciosas y que luego las publiqueis.

»Fotos: Nancy Anderson
Si quereis realizarlas podeis encontrar las instrucciones en petitepurls.com , espero que os salgan super preciosas y que luego las publiqueis.
Etiquetas:
Amigurumi con patrón
Matrioska (muñeca Rusa) Amigurumi

La matrioska o muñeca rusa (ruso: Матрёшка /mʌˈtrʲoʂkə/) son unas muñecas tradicionales rusas creadas en 1890, cuya originalidad consiste en que se encuentran huecas por dentro, de tal manera que en su interior albergan una nueva muñeca, y ésta a su vez a otra, y ésta a su vez otra, en un número variable que puede ir desde cinco hasta el número que se desee, aunque es raro que pasen de veinte. Se caracterizan por ser multicolores, o por la presencia de elementos decorativos en la pintura tales como jarrones o recipientes sostenidos por las muñecas. A veces las muñecas interiores son iguales entre sí, pero pueden diferenciarse en la expresión de la muñeca o en el recipiente contenida.
MATRIOSKAS AMIGURUMI
Pues bien, como todo hay que transformarlo, hoy transformaremos las "Matrioskas" en muñequitas amigurumi, jaja son ideales.

ayudas: wikipedia la enciclopedia libre
El recetario de Lanezi
Etiquetas:
Amigurumi con patrón
Corazón Amigurumi "patrón"

Queridas amigas os dejo el patrón de un corazón amigurumi
PUNTO UTILIZADO: PB.(punto bajo)
HILO MEDIO AGUJA AL HILO.
NOTA.- Hay que hacer dos desde la vuelta 1 a la 5.
1.- 5 puntos bajos en anillo mágico(5pb)
2.- aumentar en todos los puntos (10)
3.- 1aum,1pb y repetir (15)
4.- sin aumento (15)
5.- sin aumento (15)
6.- Unir las dos partes(de la vuelta 1 a la 5) hacer 15pb
en cada una de las dos partes (30)
7.- sin aumento (30)
8.- 1 dism, 8pb, y repetir(27)
9.- 4 pb, 1 dism, 7pb, 1 dism, 7pb, 1 dism, 3pb (24)
10.- 1 dism, 6pb, y repetir (21)
11.- 3pb, 1 dism,5pb,1 dism, 5pb, 1 dism, 2pb (18)
12.- 1 dism, 4pb, y repetir(15)
13.- 2pb, 1 dism, 3pb, 1 dism, 3pb, 1 dism, 1 pb (12)
14.- 1 dism, 2pb, y repetir (9)
15.- 1pb, 1 dism, y repetir (6)
16.- 1 dism, 1pb, 1 dism, (3).
y.... ya tenemos listo nuestro corazón. Espero que os
sean útiles estas indicaciones.
UN BESO Y FELIZ LABOR!!!
Etiquetas:
Amigurumi con patrón
Suscribirse a:
Entradas (Atom)